Most websites rely on dynamic URLs. However, in certain cases it is easiest to implement some pages with static URLs. Special URL tables are needed if dynamic keyword final URLs are used in most cases, and static keyword final URLs are only used for some special websites.
Step 1: Set up the Special URL table
To create a Special URL table, click “New table” in the “Campaign Management” tab and select “SpecialURL” from the dropdown menu. This is required to assign the table to a template.
A Special URL table must contain one column for the URL. Additionally, more columns must be added to tell Crealytics’ Search Platform which table combination to use for the special URL.
Imagine having a table for “Brand” and a table for “Category”. These are combined in a “Brand + Category” template. To make it simple, we want to implement one special URL for “adidas shoes”. The URL is “example.com/adidas_winter_shoe_sale”. In the “Brand” table, there are hundreds of entries. One of them is “adidas”. The “Category” table also has several entries. One of them is “shoes”. For the URL table, this means it needs one column for brands and one column for categories. The URL table should look like this:

Please note: The column type for “brand” and “category” must be “list”, and they are only allowed to contain one single list entry. Alternatively, proceed with step 2 before creating and filling the columns.
Step 2: Relate the columns
The next step is to set up relations between the column “brand” in the URL table and the column “name” (or similar) in the “Brand” table. The same applies to the “Category” table.
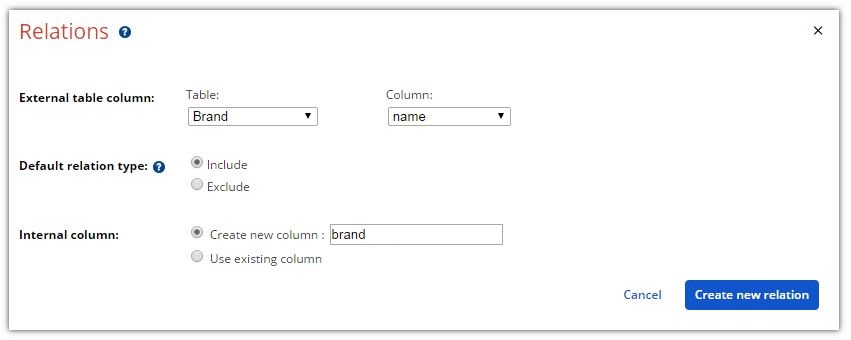
Make sure to use “include” as the default relation type.
Please note: It is not necessary to activate these relations in the template. They will not appear under “Apply Relations”, but they will be active nevertheless. Please never select a Special URL table in that same “Relations” dialogue under “Create items only if referenced in: “.
Step 3: Add special URL table to template
You may add a Special URL table while creating a new template (Button: “New template”) or after the template has already been created. The latter option is available under “Settings” > “Assign tables” in the template details page.
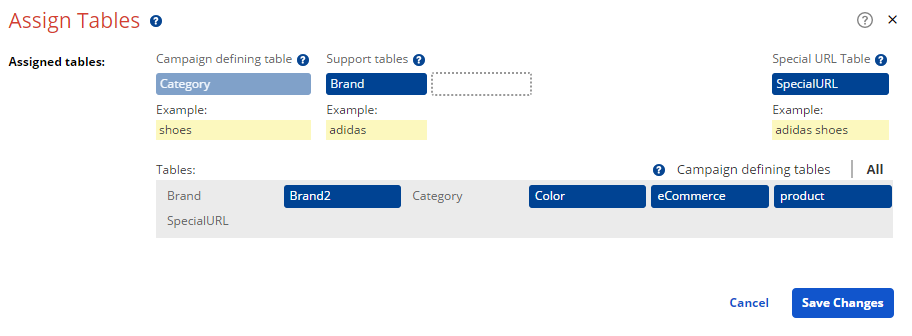
Clicking on the Special URL table will assign it to the template. The Special URL table will always be displayed in the upper right corner in “Assign Tables”. Proceed by clicking “Save Changes”. This makes the content of the Special URL table available in the template.
Step 4: Keyword final URL
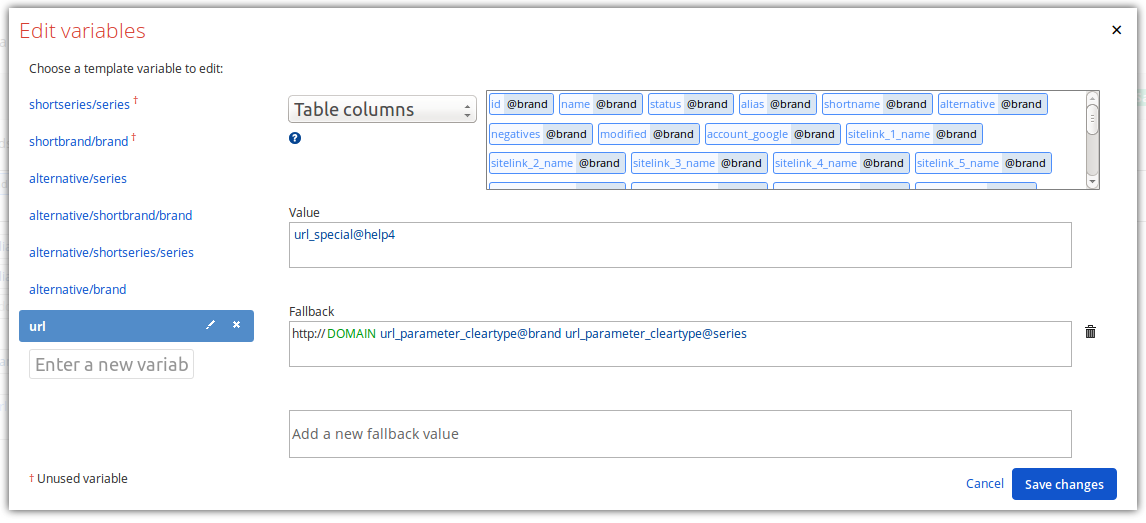
The last step is to set up a template variable that will create the keyword final URL. In the template, click “Variables” in the menu bar. This leads you to a pop-up window, where you can create a new template variable for your keyword final URL. In the value field, create the keyword final URL with the table column from the Special URL table. In the fallback fields, proceed with the usual deep linking approach. This way, whenever a special URL exists, it will be used. However, if there is no special URL for the desired combination, the template variable will jump to its next fallback and construct the deep link in the usual way.
After saving the template variable, go into the “Keywords”-tab and insert it into the “Keyword final URL”-field. This can be done by typing the name of the variable into the Keyword final URL field, or by selecting “Template Variables” in the dropdown and dragging the column name from the colorful selector into the field.
Advanced Hints

Note: Make sure to use the correct URL column in the respective template.